

We have all sent a meeting invitation with a meeting agenda before. That area of the meeting invite where the agenda goes is called the body of the appointment, shown in the green box below.
Within this area you can use what is called “plain text,” which only consists of plain characters without any formatting or Rich Text. “Rich Text” refers to a type of computer text formatting that allows for the inclusion of various text styles and formatting options. Examples: bold, italic, underline, different fonts, colors, and sizes. It enables the user to create visually appealing emails, or other forms of text-based content.
Why do we want to use Rich Text?
A Dynamics 365 user creates an appointment in Outlook and saves it (more on this in a future post – https://learn.microsoft.com/en-us/dynamics365/outlook-app/overview) in Dynamics 365 with Rich Text in the body of the appointment. When the user opens the appointment in Dynamics 365 they will see something like this:
Can you read this HTML? Which is, HyperText Markup Language, the standard markup language used for creating and structuring web pages and applications and in our case the Rich Text of the body of an appointment. HTML is the foundation for creating and presenting content on the web, providing structure, and serving as a basis for other technologies to enhance the user experience.
What the user is expecting to see is:
Side Note: In Dynamics 365 trials you will see the word Meeting vs appointment (they are the same table/entity), Microsoft just changed the display name of the table.
How can an administrator enable Rich Text?
There are two solutions to address this problem:
- Organization Settings Editor
- Environment settings in the admin center
I would check both as depending on your Dynamics 365 environment both issues could exist.
The first Solution:
Do you have the Organization setting for “appointmentricheditorexperience” set to true? What is and how do I get to the organization settings for Dynamics 365? Microsoft documentation on Organization settings can be found here: https://support.microsoft.com/en-us/topic/orgdborgsettings-tool-for-microsoft-dynamics-crm-20a10f46-2a24-a156-7144-365d49b842ba
There is a community tool put out by Sean McNellis, called OrgDbOrgSettings, found on his GitHub – https://github.com/seanmcne/OrgDbOrgSettings. The most current release of the solution is found https://github.com/seanmcne/OrgDbOrgSettings/releases.
This utility is designed for administrators who work with Dataverse in Power Platform and Dynamics 365, including applications like Dynamics 365 Sales, Service, Field Service (FS), Project Service (PS), and all Model-driven apps. It provides a user-friendly way to adjust settings without needing to use command line tools, as described in the “OrgDBOrgSettings” Knowledge Base article.
- Open https://make.powerapps.com/
- Select your environment from the top right
- Select Import solution
- Click Browse and select the OrganizationSettingsEditor zip file
- On the next screen click import
- You will now see a gray bar at the top showing you that the solution is being imported
- Once the solution has successfully imported, the bar will turn green
Now you have successful imported the OrganizationSetttingsEditor solution. Next, let us open it up and see what the current settings are for appointmentricheditorexperience.
- Open your Model driven app “Sales Hub”
- Click the gear box top right
- Click advanced settings
- Under settings carrot click on Solutions
- The solution at the top should be OrganizationSettingsEditor
- Double click it
- A new window with the solution configuration page showing opens
- Look for
- appointmentricheditorexperience
- You see above where the default value is false, and the current value is false
- We want to change those values
- Click on Edit for that line
- Then change False to True
- Click on update
- You will see the update in the main window
When you open an appointment in Dynamics 365 you should see the Rich Text “Editor” better known as WYSIWUG, “What You See Is What You Get.” This is the Control added when you have Rich Text enabled for appointments. This is the same control used for the Notes table.
Since this solution might not work for everyone, let me explain the second solution on how to enable Rich Text for Dynamics 365 appointments.
The last Solution:
If you have the DB Org setting turned on and you still do not see the Rich Text on the appointment (meeting) table, I recommend trying the steps below. More recently Microsoft has been Connecting Microsoft Teams with Dynamics 365. Part of that work required that Rich Text be turned on due to being able to schedule Teams meetings directly from within Dynamics 365. The content of the team meeting needed to be Rich Text. I was unable to find any Microsoft documentation on this, but I was able to confirm this with a Microsoft support ticket.
- Navigate to https://admin.powerplatform.microsoft.com/environments
- Select your environment
- Then select “Settings”
- On the settings screen Select Collaboration
- Within the collaboration area you will see “End User experiences”
- Look for the Model-driven apps section
- Find “End users can add and join Teams meetings from appointments in model-driven apps.”
- Turn that setting to “On”
- Open an appointment in Dynamics 365 and you should now have Rich Text enabled
- If you do not see the Rich Text, do a hard refresh by pressing down on Control andF5 buttons at the same time.
Have you ever been asked to provide a report on the historical data of leads, opportunities, contacts, and accounts to see if sales users are using the system and making updates etc.?
The sales usage reports in Dynamics 365 Sales provide sales managers with a historical perspective on operational metrics and key performance indicators. By examining metrics such as leads and opportunities usage, managers can make informed decisions to enhance sales performance. Sales usage reports are available to any user that has one of the licenses below:
- Dynamics 365 Sales Premium
- Dynamics 365 Sales Enterprise
- Dynamics CE (customer engagement) for those clients that are still under an enterprise agreement or are using the Non-profit pricing
How to enable Sales Usage Reports
You must be a system admin to enable sales usage reports.
- Login to Dynamics 365 sales Hub as the system admin
- On the bottom left you will see Sales, click “Sales”, and select “App Settings”
- Under General Settings select “Sales usage reports”
- Next you will see the image below, where the feature is disabled
- Now click the slider that shows “disabled”, and you will see the word “Enabled” to the right of the slider like the image below:
At this point, reporting has been enabled, but it may take up to 24 hours for the reports to appear in Dynamics 365. Please note that the reports will contain data that has been either added or updated in Dynamics365 Sales since the day sales usage reports were enabled. Also, data is refreshed every 24 hours.
The system administrators out there, that have built a custom Model driven app, might want to know how to add Sales usage reports to their Custom Apps. This can be accomplished by the following steps:
- Open your model driven app in the maker portal
- Navigate to “Navigation”
- Then create a Group by clicking on “Add” then select “Group”
- Update the new group Title to be “Sales Analytics”
- Then create a Subarea by click on “Add” then select “Subarea”
- On the New subarea screen
- From Content type: select “Table”
- From Table: select “Sales usage telemetry reports”
- Title: remove the word telemetry from the title
- It should now read “Sales usage reports”
- Click “Save and publish”, then click play and you will see the out of the box (OOTB) Sales usage reports in your custom app.
Now that you know how to enable it, let us move on to understanding what the reports are all about.
About Sales Usage Reports
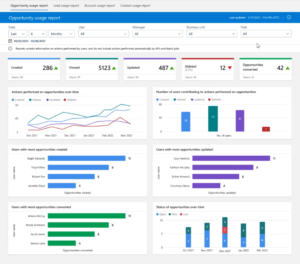
Sales usage reports are found in the Sales Hub area under “Sales Analytics” when selecting “Sales usage reports.”
The first thing you will notice is that this report is derived from a Power BI embedded report. There are four tabs within this report:
- Opportunity usage report
- Lead usage report
- Account usage report
- Contact usage report
Each report has:
- Filters
- KPI
- Charts
Let us look at which filters are available to a user:
- Date –
- This filter has three options below:
- Pick – Last, Next, This
- Number
- Days, Weeks, Weeks (Calendar), Months, Months (Calendar), Years, Years (Calendar)
- which drives the Date range you see after you select the options you want to use
- This filter has three options below:
- User –
- This filter is a list of all enabled users (system users table) in Dynamics 365 including application users and out of the box (OOTB) Microsoft native users.
- You can select 1 or more users.
- Manger –
- This Filter comes from the Manager field on the Users record.
- You can select 1 or more managers
- Business Unit
- This filter allows you to select 1 or more Business units.
- Role –
- This filter comes from the position field on the user record.
Next, let us look at what KPI’s and charts are used in each report and which common KPI’s are used. What is a KPI? KPI stands for Key Performance Indicator. It is a measurable value or metric used to evaluate the success or progress of an organization or individual in achieving specific objectives or goals. KPIs are used to track performance, identify areas for improvement, and make data-driven decisions.
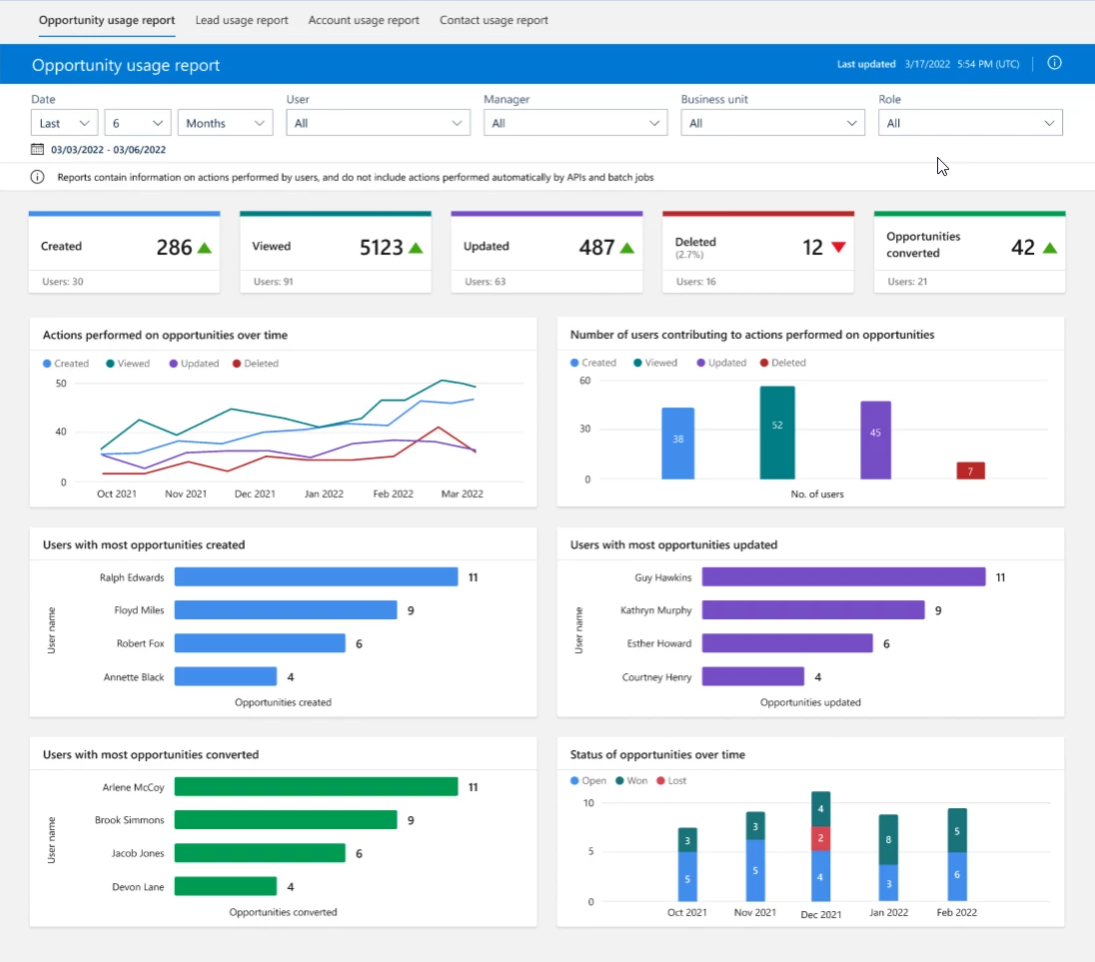
Overall, the KPIs are the same for all reports. At the top of each report, you will see 4 or 5 KPIs (one more on Opportunities than on Leads, Accounts and Contacts). The four common KPI are related to the Create Read, Update, and Delete (CRUD) operations users take on the four tables: Contacts, Opportunities, Leads and Accounts (COLA). The CRUD KPI gives the utilization of the COLA tables as well as how many users are making the operations. For Opportunity, we have a fifth KPI called “Opportunities converted” which shows us the number of won deals and the count of salespeople that who converted the opportunity to a won deal.
Charts on the reports are defined by Microsoft, – https://learn.microsoft.com/en-us/dynamics365/sales/view-understand-sales-usage-reports I have listed the information from the Microsoft docs site below for ease of reading.
- Opportunity usage report
| Chart name | Description |
| Actions performed on opportunities over time | The trend of actions taken on opportunities in the specified time period: created, viewed, updated, and deleted |
| Number of users contributing to actions performed on opportunities | The number of users who performed various actions on opportunities during the specified time period |
| Users with most opportunities created | The top four contributors who created opportunities during the specified time period |
| Users with most opportunities updated | The top four contributors who updated opportunities during the specified time period |
| Users with most opportunities converted | The top four contributors who converted opportunities into won deals during the specified time period |
| Status of opportunities over time | A breakdown of opportunities by status during the specified time period |
- Lead usage report
| Chart name | Description |
| Actions performed on leads over time | The trend of actions taken on leads in the specified time period: created, viewed, updated, and deleted |
| Number of users contributing to actions performed on leads | The number of users who performed various actions on leads during the specified time period |
| Users with most leads created | The top four contributors who created leads during the specified time period |
| Users with most leads updated | The top four contributors who updated leads during the specified time period |
| Users with most leads qualified | The top four contributors who successfully qualified leads into opportunities during the specified time period |
| Status of leads over time | A breakdown of leads by status during the specified time period |
- Account usage report
| Chart name | Description |
| Actions performed on accounts over time | The trend of actions taken on accounts in the specified time period: created, viewed, updated, and deleted |
| Number of users contributing to actions performed on accounts | The number of users who performed various actions on accounts during the specified time period |
| Users with most accounts created | The top four contributors who created accounts during the specified time period |
| Users with most accounts updated | The top four contributors who updated accounts during the specified time period |
- Contact usage report
| Chart name | Description |
| Actions performed on contacts over time | The trend of actions taken on contacts in the specified time period: created, viewed, updated, and deleted |
| Number of users contributing to actions performed on contacts | The number of users who performed various actions on contacts during the specified time period |
| Users with most contacts created | The top four contributors who created contacts during the specified time period |
| Users with most contacts updated | The top four contributors who updated contacts during the specified time period |

Focused View is a cool feature of D365 CE and it natively works on Leads, Opportunities, Contacts and Accounts out of the box (OOTB). Focused View is part of the 2023 Wave 1 Dynamics release which “allows you to view and manage account, contact, lead, and opportunity records and their associated activities on one page. This view makes it easier for you to stay focused on your tasks and reduces the need to navigate between multiple screens. It also allows you to better organize and prioritize your tasks.” There is a great blog on what Focused View is and what it offers by Megan V. Walker “Using Focused View and Up Next in Model-Driven Apps“
So why write about Focused View then? Last Thursday, I was preparing for a long weekend of yard work, spending time with family, and relaxation. However, I was asked to investigate a focus view issue, which interrupted my plans. As not all of you know me yet, I will let you in on a secret “I love a good problem” and I love to go down the rabbit hole to figure it out.
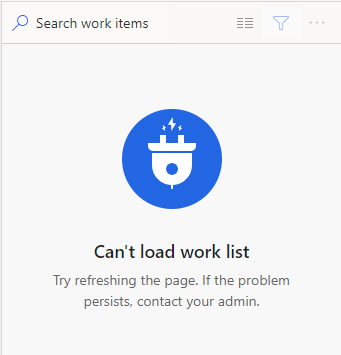
It all started off with one problem, the user was not able to load Focus view on Leads, Opportunities, or Accounts but was able to load it on Contacts where it worked like it should.
The error we got was,
“Can’t load work list – try refreshing the page. If the problem persists, contact your admin.”
I have a background in networking, so I am always looking at things from the lowest level and work my way up to find the solution.
The first thing I checked was did this user have the right Dynamics 365 License
- Dynamics 365 Sales Premium
- Dynamics 365 Sales Enterprise
- Dynamics CE (customer engagement)
The reason for the license check is this feature only works with the three license types above. If a user had a Sales team license or Customer service license, that would have been the first thing to correct.
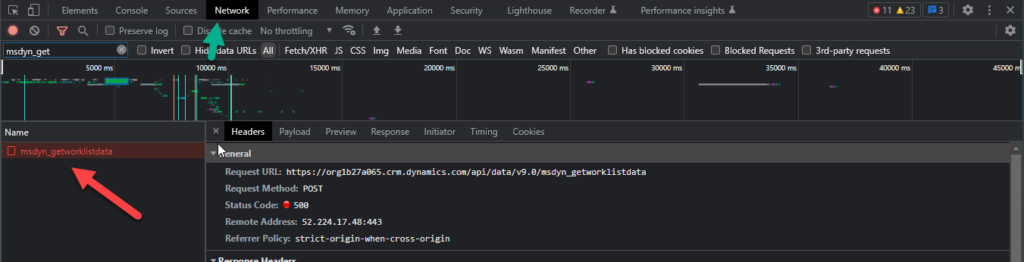
Second, when you have a security Permission issue in dynamics sometimes you get an error message on the screen but other times it is in the background. This is where using the Chrome/Edge Developer prompt F12 (in chrome) can assist you in your troubleshooting. After you open developer Prompt, you can click on the network tab. Here you will look for Names that are in Red. These show errors in calls, for example “msdyn_getworklistdata.” By using the Developer prompt, it will sometimes show you a useful error message. As you can see from the message below, I am getting an error 500/400 from the API call from the work list table. Which does not show me any Permissions out right to check. I was not able to reproduce this error on my computer so I thought this might be a bug.
{“error”:{“code”:”0x70070003″,”message”:”WorklistDataProviderService: GetWorklistDataForSavedQuery failed.”,”@Microsoft.PowerApps.CDS.ErrorDetails.HttpStatusCode”:”400″,”@Microsoft.PowerApps.CDS.HelpLink”:”http://go.microsoft.com/fwlink/?LinkID=398563&error=Microsoft.Crm.CrmException%3a70070003&client=platform”,”@Microsoft.PowerApps.CDS.TraceText”:”\r\n[Microsoft.Dynamics.AcceleratedSales.SandboxPlugins: Microsoft.Dynamics.AcceleratedSales.SandboxPlugins.GetWorklistData]\r\n[7f7ff542-27d6-ed11-a7c7-000d3a8bcaaa: CustomApi ‘msdyn_getworklistdata’ implementation]\r\n\r\n”,”@Microsoft.PowerApps.CDS.InnerError.Message”:”WorklistDataProviderService: GetWorklistDataForSavedQuery failed.”}
Third, in most CRM systems we do not use the OOTB security roles. We want to control the level of access a user has within our custom security roles. Because we use a custom security role, I assigned the users the system administrator (OOTB) security role. This was to rule out that this was a security permissions issue. This allowed the user to see Focused View working 100%. As the system administrator role grants full access, I tried the OOTB salesperson role and that worked as well.
I discovered that the issue was related to a missing CRUD permission in the Salesperson security role. I tried using F12 in Chrome to identify the problem, but that did not work. Instead, I made a copy of the OOTB Salesperson role and named it Test role. I then assigned the user with the issue to the new role, and the Focus View started working correctly.
Within a given security role there are 10 diff tabs, which group types of CRUD permission by areas like Sales, Service, Core. As focus view was new, I stared with looking in the Sales and the Custom Entities tab. Note that Custom Entities are a catch all for both custom tables (entities are the old name) that a maker or system admins create, and it is also a catch all for Microsoft to put whatever does not fit into another tab.
I started with the custom tab and started to remove CRUD access from the tables. This is done in 1 of 2 ways, the first is to click the table name which will add the next level of CRUD to each permission until they are blank. The second way is to select one of the CRUD permissions and click it till it changes to blank. I repeated this process until Focused View broke and now I had the missing permission that the user needed.
Solution 1
If you are using the OOTB salesperson role or a full unedited copy of it, you should be fine but if you are like most you have created your own role you will need to make this update to your custom role.
- Open your security role
- Navigate to custom
- Scroll down until you find the Predictive Score and make it Organization level

Now this is where I chased the Rabbit. Why Is this that case? While examining the “Work Item Card”, I thought there was a field that users could not access, and it turned out that was indeed the case.
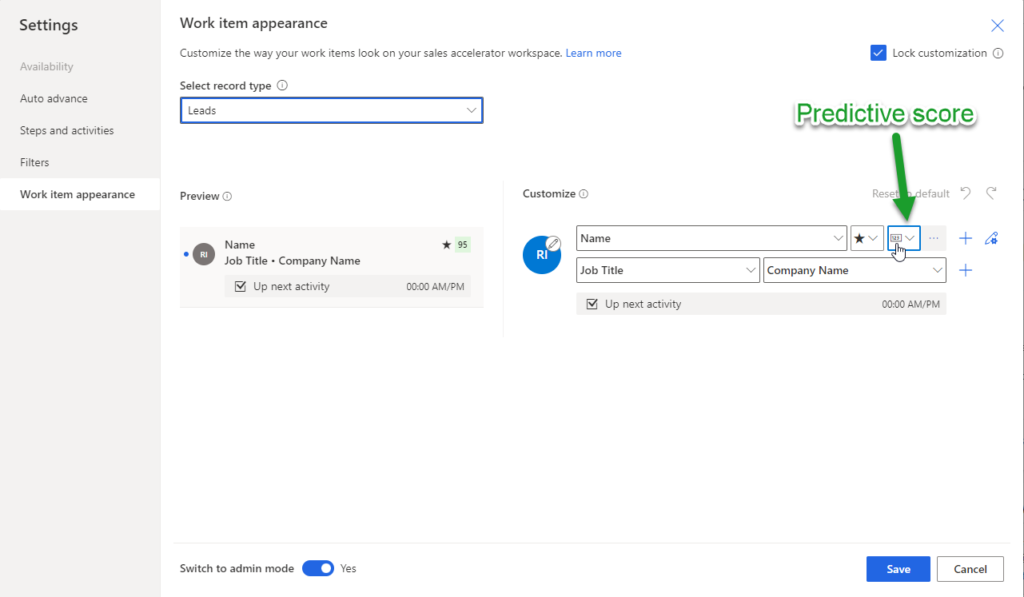
Leads have Predictive Score on the OOTB Work Item card.
Normally we do configuration for card forms from the maker portal. In this case we configured the “Work Item Card” from within the work item appearance area of the Settings for Work Items.
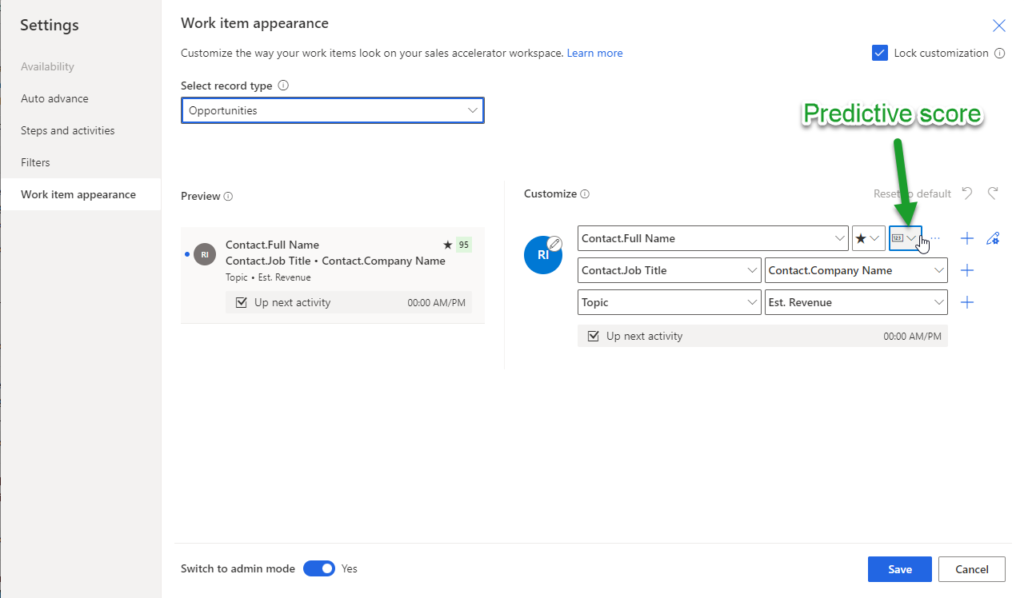
Opportunities have Predictive Score OOTB Work Item card.
So, at this point now Leads, Opportunities and Contacts worked for the user, but Accounts did not. Let us apply what we just learned above to Accounts work item and see if anything jumps out. The first thing is that we do not see Accounts listed in the “Select Record type” and we have no work item card. With no Record type for Accounts the Focus View will not work.
As I activated a quick trial of D365 Sales to see what OOTB for sales accelerator (workspaces) was (which is where the Record types are driven from for the work item cards) Microsoft Doc on Sales Accelerator or better yet check out D365goddess blog on “What’s new with the Sales Accelerator“ and Customize Work List Cards
OOTB Only leads are enabled when you enable Sales accelerator for Workspaces. Once I added Accounts it worked with no problem for my user and problem two was solved.
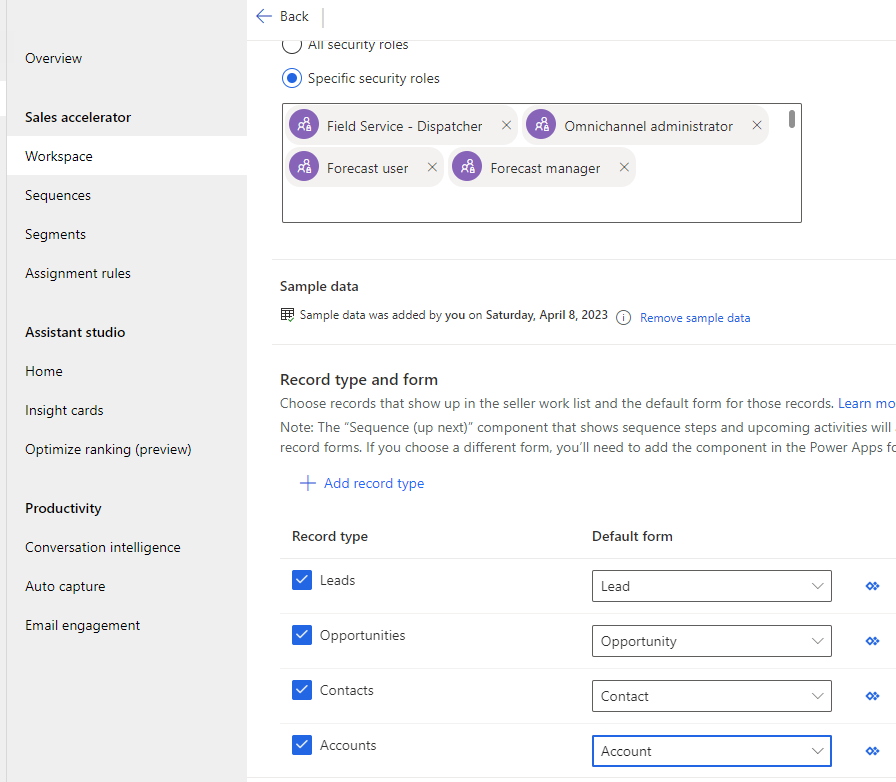
Solution 2 – Steps to address:
- open Sales App
- navigate to sales insights settings
- Click Workspaces
- under Manage access and Record type click configure
- Under Record type and form select Account and then select a form publish and you should be good to go
What I learned here is that Focus view assumed your using Sales Insights which is where predictive score comes from, and that Microsoft might say “Focused view is available for Accounts, Contacts, Leads, and Opportunities entities” but you still need to enable it on the Sales Accelerator Workspaces for it to work correctly.